Star Orienteering
An activity to familiarize participants with orienteering details and the star orienteering method.
- 6+ years
- Group size: 2+
- Duration: 30 min
- Orienteering
- Mountains, forests and fields
- Open space
Take photos of well-known places in the local area that participants will recognize, for example:
- large stones
- the flagpole
- a special tree
- the sandbox
Choose a base in the area and take photos of places around this base. It might be a good idea to laminate the pictures so they can be used multiple times.
Create punch cards for the participants. Each control point gets a letter code, and next to each letter, there must be space for a punch. Hang out orienteering control points and punch pliers at the depicted locations. Each control point must be clearly marked with its number or letter.
Procedure
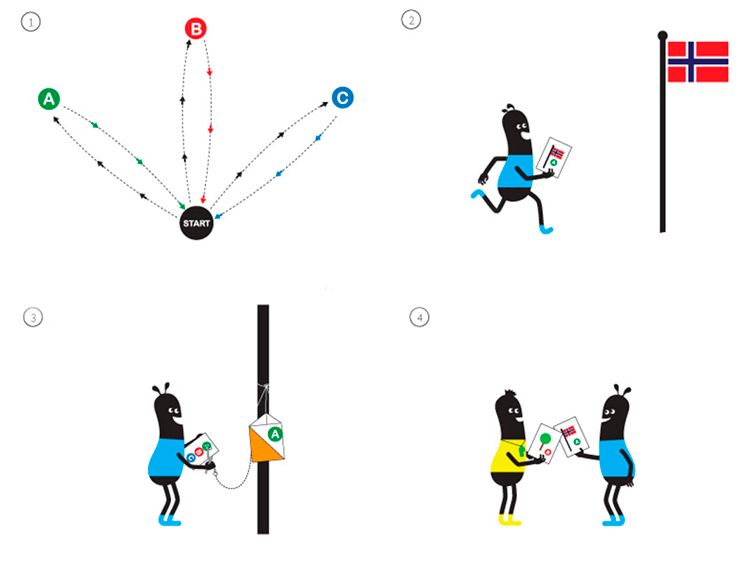
The base is centrally located in relation to where the control points are, and this is where everyone meets to carry out the activity. Participants are divided into teams of approximately 2–4 people.
The orienteering race starts with teams being given one picture of a known place.
Example:
Lars's team receives a picture of the flagpole and runs there. An orange and white orienteering control point hangs there. On the back is the letter A. With the punch pliers, the team punches the punch card next to the A. Then they run back to the base, hand in the picture, and receive a new picture of a different place.
When there are many participants, there should also be many control points. As a rule of thumb, there can be approximately 50% more control points than teams, so that there is always a free picture available when a team returns to the base. Not all teams need to visit all control points. For example, you can decide that teams are finished when they have visited five different control points.
In this way, teams that need adaptation can also be directed to easily accessible control points, without it being perceived as special treatment.
Progression
1. From Star Orienteering to Course
Eventually, you can transition from always returning to the base to completing a continuous course:
- The children see a picture of a known place, for example, the flagpole, and run there.
- At the control point, a new picture hangs, for example, of the large oak tree, and the children run further to it.
- They continue like this from control point to control point.
- Finally, the course ends with a picture of the place where the race started.
In this way, they get to experience a 'round course' without returning to the base each time.
2. Transition to Map
If the school has orienteering maps of the local area (you can contact the local orienteering association or federation for help with this), you can eventually stop using pictures and instead hand out laminated maps.
- The control points are marked with red circles on the map.
- Participants must learn to 'orient the map,' i.e., turn the map correctly in relation to the terrain.
- This provides a natural transition from picture orienteering to using real maps in orienteering activities.